Getting Started
Battery Fitting/Replacement
Remove the battery compartment cover by sliding it carefully down to remove it from the casing. Insert carefully 2 x AAA 1.5V batteries noting the polarity shown on the connection terminals. Receiver speaker will sound when batteries are fitted correctly. Replace the battery cover ensuring that it closes positively into place.
Switching On / Off
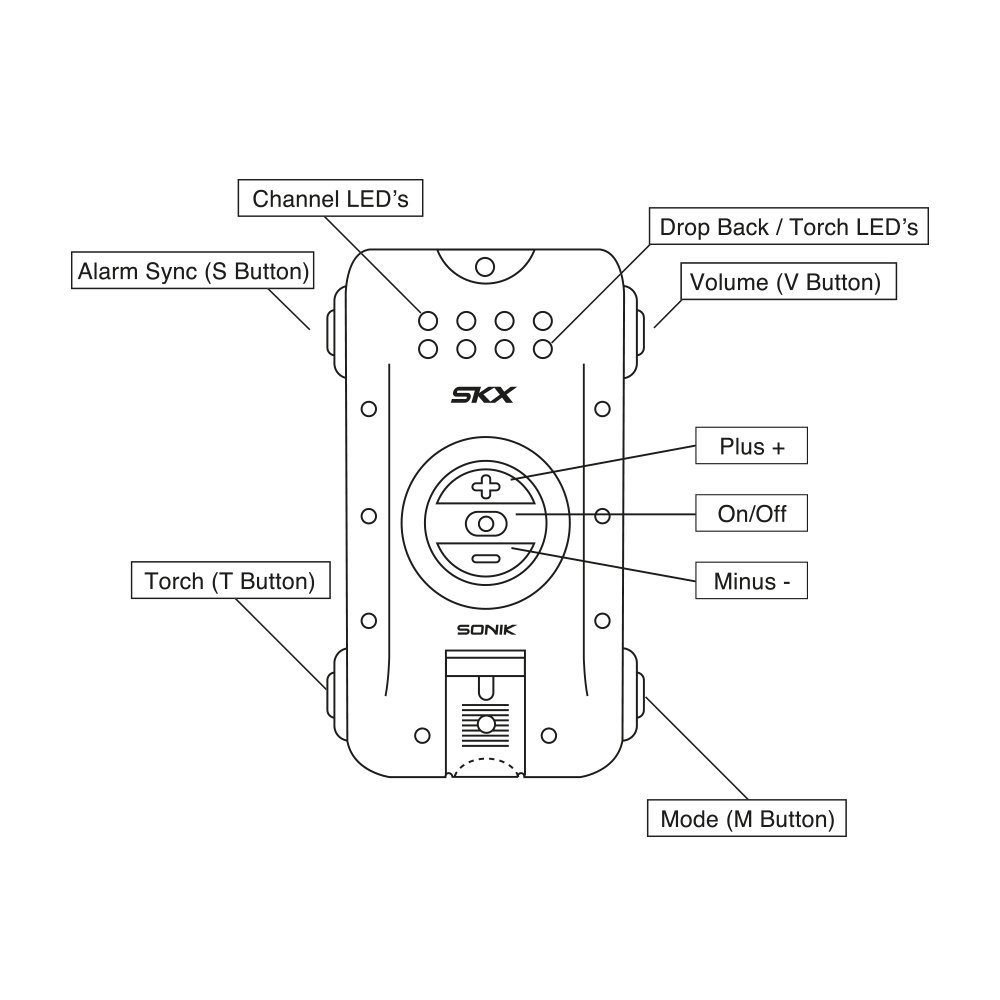
To turn the receiver on, press and hold the on/off button; LED’s will flash multi-colour.
To turn the receiver off, press and hold the on/off button; LED’s will flash and speaker sounds.
Volume Control
To adjust volume, briefly press and release the V button; now press the ‘+’ or ‘-‘ button to increase or decrease the speaker volume. Leave for 5 seconds to set. The lowest volume setting is silent.
Torch Function
To enter torch mode press the T-button followed by the ‘+’ or ‘-‘ button to turn the torch LED’s on or off
Synchronisation
Please note that your alarms should come pre-registered to the receiver. However, if you would like to change the registration order or add a fourth alarm to the receiver; follow the steps below.
Press and hold the S-button, the first channel LED will illuminate.
- Press the ‘+’ or ‘-‘ button to cycle up and down the four channel positions. (Bright LED = channel free, Low LED = Channel in use) To sync an alarm head the channel must be free. (see step 3 below otherwise move to step 4)
- To erase a synced channel press and hold the S-button, the channel LED changes from low to high brightness. To quickly erase all channels, Press and hold the S-button for a longer time until all LED’s flash bright.
- When the chosen channel is selected and free, activate the required alarm head by rotating the roller wheel. The receiver will beep; indicating the pairing is complete.
- Repeat steps 3 and 4 to sync other alarm heads to the receiver.
- Turn the receiver off/on or wait for 5 seconds for the receiver to return to normal function.
Mode Selection
To select the receiver mode, briefly press and release the M button; now press the ‘+’ or ‘-‘ button to cycle up and down the three following receiver modes; mode selection will confirm after 5-seconds.
1) Light + Sound
2) Light + Vibration
3) Light + Sound + Vibration
Functions in Use
When activated the SKX receiver will replicate the alarm speaker activation and tone. The channel LED activated will remain latched for 25 seconds. When drop back indication is detected the white Drop back LED will illuminate and a lower speaker tone will sound. The receiver will remember its channel, volume and mode setting even if the battery is disconnected or removed.
Anti-Theft Warning
If the receiver detects that an alarm head has been turned off, an audible alarm will sound on the receiver and can be cancelled by briefly pressing the on/off button.
Low Battery Warning
Receiver Battery – When a low voltage is detected the four white LEDs will flash quickly 5-times once every ten minutes.
Alarm Battery – When a low alarm head battery voltage is detected the receiver channel LED will flash quickly 5-times after the affected alarm activation.
Notes
Maximum battery voltage should never exceed 5V or damage to electronic components is possible.
Each main receiver will only respond to paired transmitters.
To conserve battery life; the receiver should be powered off when not in use. Please remove the battery when unit is not being used for extended periods of time.
Use of good quality alkaline batteries is recommended for best performance.
Receiver Tech Specs
- Battery Type: AAA
- Battery voltage: 3V
- Power off current consumption 0.03mA
- Operating Current (peak level): 200mA